Shortcrust pastry from The Book of Old Tarts
 Saturday, August 14, 2010 at 3:20PM

A very dear family friend, Elizabeth Hodder, wrote a wonderful recipe book called ‘The Book of Old Tarts’. Lizzie has always treated me as if I were her daughter; she is kind, gentle and doting, always willing to listen and give me her worldly advice. She is also extremely knowledgeable and very well spoken. This motherly image I have of her means that I still to this day find myself shocked and pleasantly surprised when she shows her cheeky side. She once sent my Mum an apron which read:
FUCK ME
WHILE
I’M COOKING
I thought this was absolutely hilarious, not so much because of what it said, but because of who’d sent it. The name of her book is another great example of this.

Ignoring the pun, the book is in fact about exactly what the title suggests, i.e. it is a collection of tart recipes which delves into their historical origins. As a more eloquent person than me put it in a comment on Amazon:
Luscious but not louche ... It's a book by a cook who sounds as if she has been around the kitchen a few times: in the tradition of Claudia Roden, Hodder not only talks you through the recipe but provides scholarly excursions into its history and glimpses of her own philosophy of cooking.
I particularly like the last point this person makes, which highlights the way Lizzie’s personality comes through on the pages of her book. When flicking through it again before writing this recipe, I loved being reminded of Lizzie’s hints for making pastry, her number 1 tip being to “remember that a glass of chilled wine helps to keep your hands cold”. Brilliant.
I was first inspired to make my own pastry by this book and it is the recipe I have stuck to ever since. That is not to say that I haven’t tried others - one should always give new things a try - but I have found that the quantity is just right for most recipes I make with shortcrust and her method is one of the more helpful I have seen. Nonetheless, there are a few points I have learnt through trial and error that I feel it important to share with you.
Lizzie’s recipe calls for ‘a small amount of very cold water’; I would go further and say that you really ought to ice it to ensure that it is as cold as possible. In addition, I think it might be helpful to quantify the amount of water and say that you will need more than a few tablespoons, but that it should be no more than 125mls. The first time I made the recipe, I added only a few drops on account of the instructions saying ‘very small’, but soon went in search of Dad to ask him why it wasn’t working, “cause it needs more water, Beano, duh!” Basically you need to add enough water to bring the dough together, but not so much that it becomes damp and sticky.
Another point is that I choose to grate rather than chop my butter. While one could argue that this means it will warm up more quickly, it does reduce the amount of time you have to spend handling the mix because it is easier to rub into the flour. In either case, it is important that the butter is straight from the fridge, so that it remains as cold as possible. As I mentioned in my rough puff pastry post, some people advise cooling your hands in a bowl of iced water as additional measure to keep things cold.
Finally, when trimming the pastry around the edge of the tart tin, I would recommend leaving an overhang of approximately 1 cm, because even if you do refrigerate the pastry case before putting it in the oven (I sometimes skip this step), it will still shrink a bit when you blind bake it which is particularly annoying if your tart dish is quite shallow.
Bearing these tips in mind, here is Lizzie’s recipe as it appears in the book.
Ingredients
Method
Sift the flour from quite a height into a bowl, allowing lots of air in. Add salt, then rub the chopped butter into the flour using the tips of your fingers only, until the mixture becomes like breadcrumbs; use your fingers repeatedly to lift the mixture up, so as to let in as much air as possible.
Sprinkle cold water over the mixture, then use a flat-sided palette knife or similar to bring it together so that it just starts to leave the sides of the bowl. Knead very briefly with your fingers into the shape of a ball. Wrap in clingfilm, polythene or foil and put in the fridge to rest for 30 minutes. While the pastry is resting you can prepare the filling. Take the pastry from the fridge and, using a rolling pin, roll it out on a lightly floured surface, rolling away from you, until the pastry is about 3mm (1/8 in) thick.
Line the tart tin – this is done most easily by rolling the pastry around the rolling pin and then carefully unrolling it over the tin. Push the pastry right up to the edge and make sure that it reaches the top of the tin’s rim. The lined tin should then be returned to the fridge for a further 30 minutes before being put in the oven; this will prevent the tart from shrinking too much during cooking.
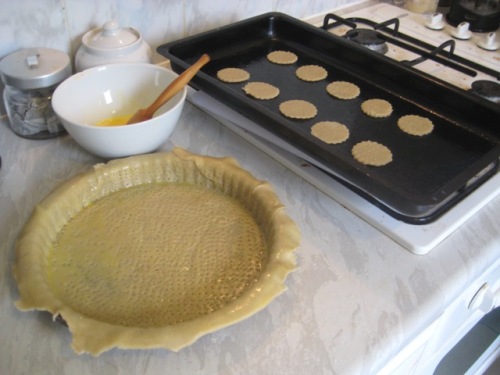
 For the record, this tart case has been blind baked for too long. It should not be this golden, let alone browning at the edges!
I hope that the lengthy preamble to this recipe does not put you off attempting to make your own. That being the case, here are some words of encouragement from The Bourke Street Bakery Cookbook,
Having the ability to make your own pastry has got to be one of the most satisfying achievements in the kitchen. You can produce a much better quality product than you can buy in any supermarket and after a few attempts you should find that you can master most of the tasks fairly quickly ... Don’t be too worried about the look; short of burning the pastry or having the shell completely break, you can push ahead, as the result is bound to be tasty.
 Vix
Vix
Below is a very good example of why you should not be lazy and skip steps when pastry making. I was planning to make one of the tarts from Lizzie's book tonight so that I could follow up this post with one of her recipes, but I was hungover and hungry so decided not to refrigerate the pastry case before putting it in the oven. As you can see the pastry shrunk rather a lot, so much so that not even my extra centimetre overhang saved the day.

I hate wasting food, so I had a go at salvaging the pastry. I ended up slicing some of the edge off to even it out and cooking the pastry a bit longer than I would for blind baking so that it was almost cooked through. I then put some of the dry ingredients on top, leaving out the liquid (egg and cream based) mix that was originally planned for the filling. This was the result:

My accidental tart.
 Vix |
Vix |  3 Comments |
Reader Comments (3)
This is the recipe that got me over my fear. It's surprisingly simple and even worked first go! (although there were a couple of holes in the side that I needed to patch). It really is one of the most satisfying things I've done.
Well I've made 'the tart' and I have to say even without chilling my hands around a glass of white wine (it was about 4 in the afternoon) - it was rather fabulous - and clearly the pastry was so well chilled that I had a niagra falls effect with my pastry overhang! So now I have to try Lizzie's to do the true comparison. Vicky - I noticed that you put egg on your pastry cases - so I followed suiit but then had a hilarious time later trying to pick out my ceramic bindng marbles which had got stuck to the pastry case! So my question is - does the egg make a difference? - taste/ looks better? If so I guess I just need to have a bit of patience and wait till the egg dries before throwing the binding marbles in and onto the oven.
Thanks for your very helpful comment, Paula. This is my fault for not explaining that I do not use beans to blind bake, apologies! I prick with a fork, do egg wash and that is it. I have been meaning for ages to do a tips and techniques post on blind baking offering both alternatives. However, even when blind baking, the egg is important for 'waterproofing' the case so it doesn't get soggy. I think if I were using beans though, I'd probably put it on after and then put it back in for 5 mins. Thanks again for raising this issue.